

Lower back pain doesn’t only kick in when you grow old. Ask us – we know!
Your lumbar region can become sensitive at any age – be it because we spend a lot of our time sitting down or because we move a lot. And lower back pain can seriously affect your mood – the constant back pain seems to have a direct relationship with your frown – the both seem to grow together. But we’ve recently found out that YOGA can be a great pain reliever. Here are five yoga poses to ease lower back pain and relieve that dull ache:
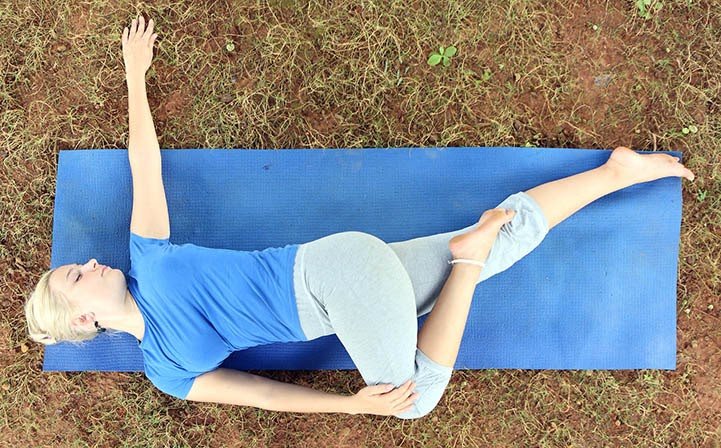
1.Supine Twist
-
- Lie down on your back.
- Bend your knees and put the soles of your feet on the floor with your knees pointing up toward the ceiling.
- Press into your feet to lift your hips slightly off the floor and shift them about an inch to your right. This is an important step because it sets your hips up to stack one on top of the other when you move into the twist.
- Exhale and draw your right knee into your chest and extend your left leg flat on the floor. Keep your left foot actively flexed throughout the pose. Inhale.
- Exhale and cross your right knee over your midline to the floor on the left side of your body. Your right hip is now stacked on top of your left hip. You can hook your right foot behind your left knee if you like.
- Open your right arm to the right, keeping it in line with your shoulders. Rest your left hand on your right knee or extend it to make a T shape with the arms. Turn your palms toward the ceiling.
- Turn your head to the right, bringing your gaze over your shoulder to your right fingertips. You can skip this step if it doesn’t feel good on your neck.
- On your exhalations, release your left knee and your right shoulder toward the floor.
- Hold the pose for five to 10 breaths. To come out of the pose, inhale and roll onto your back, drawing your right knee into your chest. Release both legs to the floor to neutralize your spine for several breaths before doing the other side.
2.Sphinx Pose
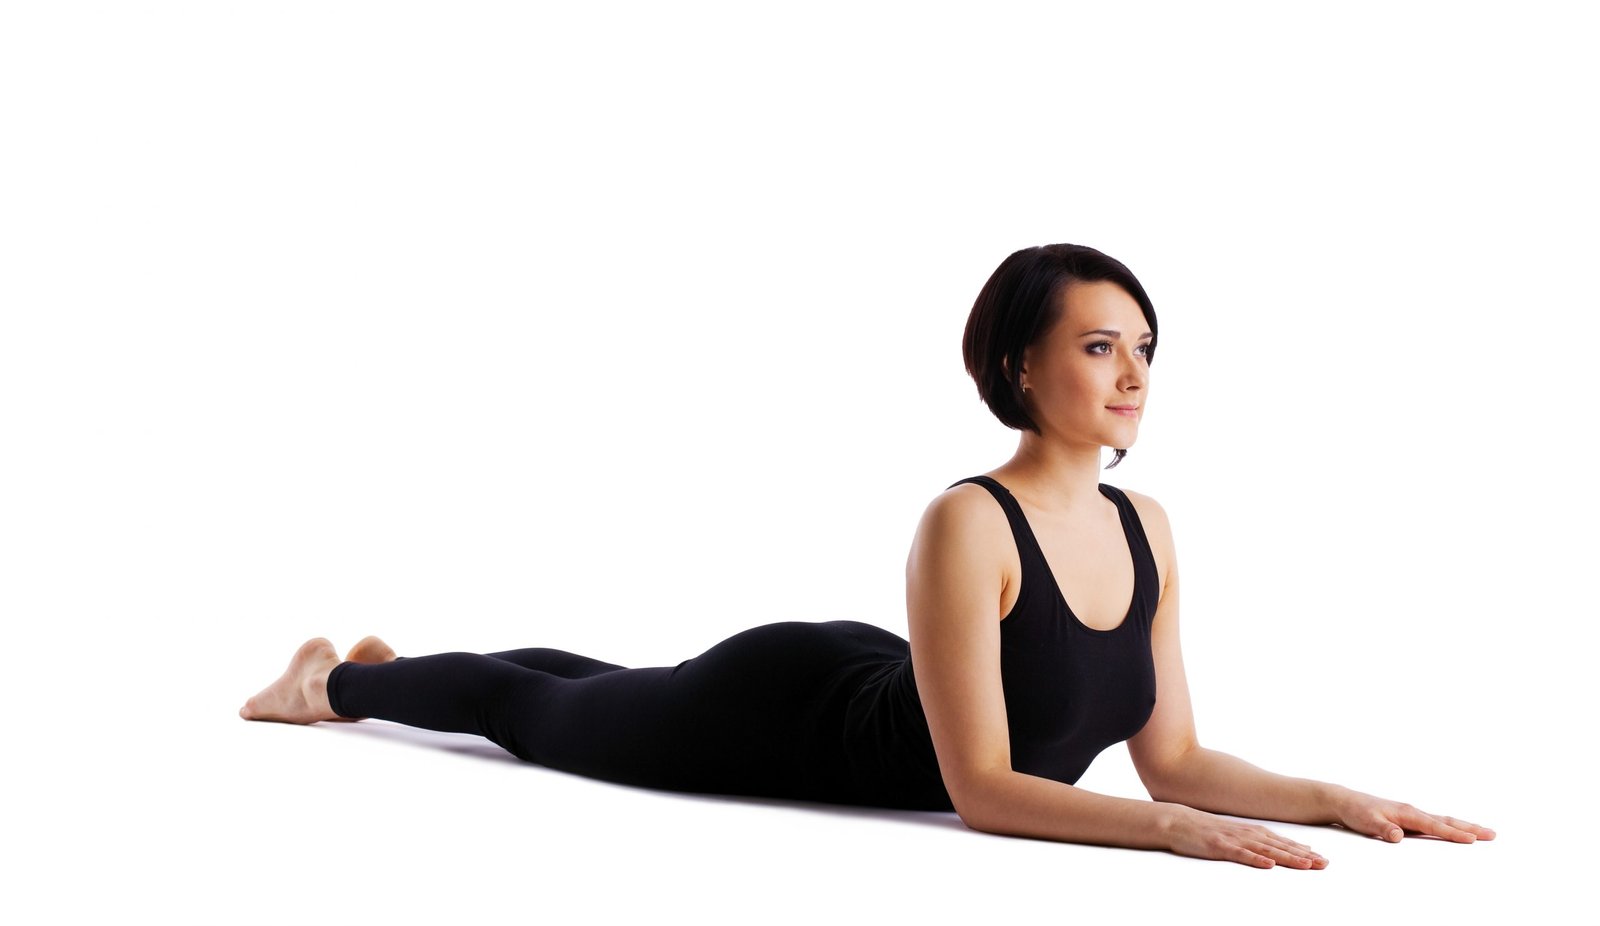
- Lie face down on your tummy.
- Lift your kneecaps, connect your inner thighs, and press the tops of your feet firmly into the Earth.
- Slide your hands back until your elbows are directly under your shoulders and press up onto your forearms.
- Press firmly into your palms (facing down).
- Send your heart forward and play with the amount of intensity that’s nourishing for you right now.
- Extend out of the crown of your head and create space between your ears and your shoulders.
- .Send your breath to any tight places and hold the pose for at least one minute, or longer if it remains comfortable.
3.Downward Facing Dog Pose

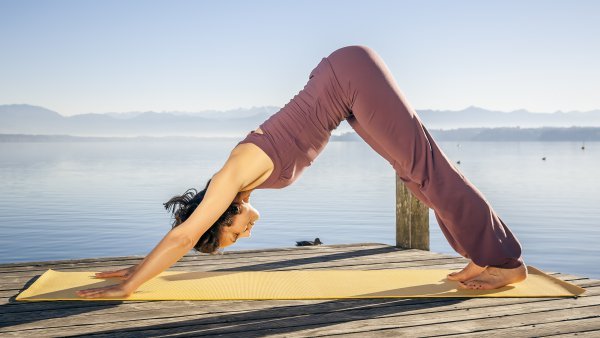
- Begin on your hands and knees. Align your wrists directly under your shoulders and your knees directly under your hips. The fold of your wrists should be parallel with the top edge of your mat. Point your middle fingers directly to the top edge of your mat.
- Stretch your elbows and relax your upper back.
- Spread your fingers wide and press firmly through your palms and knuckles. Distribute your weight evenly across your hands.
- Exhale as you tuck your toes and lift your knees off the floor. Reach your pelvis up toward the ceiling, then draw your sit bones toward the wall behind you. Gently begin to straighten your legs, but do not lock your knees. Bring your body into the shape of an “A.” Imagine your hips and thighs being pulled backwards from the top of your thighs. Do not walk your feet closer to your hands — keep the extension of your whole body.
- Press the floor away from you as you lift through your pelvis. As you lengthen your spine, lift your sit bones up toward the ceiling. Now press down equally through your heels and the palms of your hands.
- Firm the outer muscles of your arms and press your index fingers into the floor. Lift from the inner muscles of your arms to the top of both shoulders. Draw your shoulder blades into your upper back ribs and toward your tailbone. Broaden across your collarbones.
- Rotate your arms externally so your elbow creases face your thumbs.
- Draw your chest toward your thighs as you continue to press the mat away from you, lengthening and decompressing your spine.
- Engage your quadriceps. Rotate your thighs inward as you continue to lift your sit bones high. Sink your heels toward the floor.
- Align your ears with your upper arms. Relax your head, but do not let it dangle. Gaze between your legs or toward your navel.
- Hold for 5-100 breaths.
- To release, exhale as you gently bend your knees and come back to your hands and knees.
Your lower back supports the whole torso, so taking care of it is kind of important. Start with these yoga positions, and for a better guide, follow some amazing yogis on Youtube for better visual guide on how to do these poses right. And you can also make a few changes in your lifestyle – sit less, move more and continue to stretch your back. However, if the back pain persists, it is best to consult a doctor to make sure it nothing more than regular stiffness in your lower back.